vue3+elementplus的表格展示和分页实战

Element Plus 是一个基于 Vue 3 的现代化 UI 组件库,旨在帮助开发者快速构建美观且功能丰富的 Web 应用程序。它提供了大量的 UI 组件,如按钮、表单、表格、弹出框、标签页、树形控件等,涵盖了 Web 应用开发中常见的大多数场景。本文通过一个实例来说明vue3+elementplus查询、展示和分页实战。

一、Element Plus的安装使用

要开始使用 Element Plus,首先需要在项目中安装它。如果你正在使用 Vue 3 的项目,可以通过 npm 或 yarn 安装 Element Plus:

1
npm install element-plus

然后可以在Vue 项目中全局引入 Element Plus:

1
2
3
4
5
6
7
8
9
10
11
12
13
14
15
16
17
18
19
import { createApp } from 'vue'
import App from './App.vue'

// 导入路由
import Router from './components/tools/Router'
// 导入ElementPlus
import ElementPlus from 'element-plus'
import 'element-plus/dist/index.css'
import * as ElementPlusIconsVue from '@element-plus/icons-vue'

const app = createApp(App)
// 遍历ElementPlusIconsVue中的所有组件进行祖册
for (const [key, component] of Object.entries(ElementPlusIconsVue)) {
// 向应用实例中全局注册图标组件
app.component(key, component)
}
app.use(ElementPlus) // 使用ElementPlus
app.use(Router); // 使用路由
app.mount('#app')

二、el-table 表格组件

el-table 是Element Plus 中的一个重要组件,用于展示列表数据。可以通过 组件来定义表格中的每一列,包括列标题、列宽、对齐方式等,可以结合 el-pagination 可以实现分页功能。示例代码如下:

1
2
3
4
5
6
7
8
9
10
11
12
13
14
15
16
17
18
19
20
21
22
23
24
25
26
27
28
29
30
31
32
33
34
35
36
37
38
39
40
41
42
43
44
45
<el-table
ref="multipleTable"
:data="postList"
tooltip-effect="dark"
style="width: 100%"
fit
:pagination="pagination"
@selection-change="handleSelectionChange" >
<el-table-column
type="selection"
width="55">
</el-table-column>
<el-table-column
label="ID"
width="100"
prop="id">
</el-table-column>
<el-table-column
label="标题"
width="450"
prop="title">
</el-table-column>
<el-table-column
label="是否置顶"
width="100"
prop="isTop">
</el-table-column>
<el-table-column
label="热度"
width="100"
prop="viewsCount">
</el-table-column>
<el-table-column
label="发布时间"
width="200"
prop="pubTime">
</el-table-column>
<el-table-column
label="操作"
>
<template #default="scope">
<el-button size="mini" type="danger" @click="deleteItem(scope.$index)">删除</el-button>
</template>
</el-table-column>
</el-table>

其中
:data="postList" 绑定要显示在表格中的数据源,通常是一个对象数组
fit: 让表格宽度自动填充父容器。
:pagination="pagination" 绑定分页的数据对象

数据定义如下:

1
2
3
4
5
6
7
8
9
// 博客文章列表数据
postList:[],
// 分页
pagination: {
currentPage: 1, // 当前页
pageSize: 10, // 每页显示条数
total: 0, // 总条数
layout: 'total,sizes,prev, pager, next, jumper', // 分页布局
},

三、el-pagination 分页组件

el-pagination Element Plus 中用于实现分页功能的重要组件。它可以与 el-table 组件结合使用,实现数据的分页显示。示例代码如下:

1
2
3
4
5
6
7
8
9
<el-pagination
@size-change="handleSizeChange"
@current-change="handleCurrentChange"
:current-page="pagination.currentPage"
:page-sizes="[10, 20, 30, 40]"
:page-size="pagination.pageSize"
layout="total, sizes, prev, pager, next, jumper"
:total="pagination.total">
</el-pagination>

属性
@size-change="handleSizeChange" 当每页显示数量变化时触发。
@current-change="handleCurrentChange" 当当前页变化时触发。
:current-page="currentPage" 设置当前页。
:page-sizes="[10, 20, 30, 40]" 设置每页可选的数量。
:page-size="pageSize" 设置每页显示的数量。
layout="total, sizes, prev, pager, next, jumper" 设置分页布局。
:total="tableData.length" 设置总数据量。
方法:
handleSelectionChange(val) 处理行选择变化。
deleteItem(index) 删除指定行。
handleSizeChange(val) 处理每页显示数量变化。
handleCurrentChange(val) 处理当前页变化。

四、全部代码

1
2
3
4
5
6
7
8
9
10
11
12
13
14
15
16
17
18
19
20
21
22
23
24
25
26
27
28
29
30
31
32
33
34
35
36
37
38
39
40
41
42
43
44
45
46
47
48
49
50
51
52
53
54
55
56
57
58
59
60
61
62
63
64
65
66
67
68
69
70
71
72
73
74
75
76
77
78
79
80
81
82
83
84
85
86
87
88
89
90
91
92
93
94
95
96
97
98
99
100
101
102
103
104
105
106
107
108
109
110
111
112
113
114
115
116
117
118
119
120
121
122
123
124
125
126
127
128
129
130
131
132
133
134
135
136
137
138
139
140
141
142
143
144
145
146
147
148
149
150
151
152
153
154
155
156
157
158
159
160
161
162
163
164
165
166
167
168
169
170
171
172
173
174
175
176
177
178
179
<template>
<div class="content-container" direction="vertical">
<!-- input -->
<div>
<el-container class="content-row">
<div class="input-tip">
文章标题:
</div>
<div class="input-field" style="width: 400px;">
<el-input v-model="queryParam.words"></el-input>
</div>
<el-button type="primary" @click="getBlogList">筛选</el-button>
<el-button type="danger" @click="clear">清空筛选</el-button>
</el-container>
</div>
<!-- list -->
<div>
<el-tabs type="card" @tab-click="handleClick">
<el-tab-pane label="全部"></el-tab-pane>
<el-tab-pane v-for="(item,index) in blogCategorys"
:key="index"
:label="item.title"
:name="item.id">
</el-tab-pane>
</el-tabs>
<el-table
ref="multipleTable"
:data="postList"
tooltip-effect="dark"
style="width: 100%"
fit
:pagination="pagination"
@selection-change="handleSelectionChange" >
<el-table-column
type="selection"
width="55">
</el-table-column>
<el-table-column
label="ID"
width="100"
prop="id">
</el-table-column>
<el-table-column
label="标题"
width="450"
prop="title">
</el-table-column>
<el-table-column
label="是否置顶"
width="100"
prop="isTop">
</el-table-column>
<el-table-column
label="热度"
width="100"
prop="viewsCount">
</el-table-column>
<el-table-column
label="发布时间"
width="200"
prop="pubTime">
</el-table-column>
<el-table-column
label="操作"
>
<template #default="scope">
<el-button size="mini" type="danger" @click="deleteItem(scope.$index)">删除</el-button>
</template>
</el-table-column>
</el-table>
<div class="pagination-container">
<el-pagination
@size-change="handleSizeChange"
@current-change="handleCurrentChange"
:current-page="pagination.currentPage"
:page-sizes="[10, 20, 30, 40]"
:page-size="pagination.pageSize"
layout="total, sizes, prev, pager, next, jumper"
:total="pagination.total">
</el-pagination>
</div>
</div>
</div>
</template>

<style scoped>
.pagination-container {
margin-top: 20px;
text-align: center;
}
</style>

<script>
import {getBlogList,getBlogCategory} from '@/api'
export default {
data() {
return {
// 博客文章列表数据
postList:[],
// 筛选博客的参数
queryParam:{
words:"",
cateid:"",
tag:"",
search:"",
page:1,
size:10
},
// 分页
pagination: {
currentPage: 1, // 当前页
pageSize: 10, // 每页显示条数
total: 0, // 总条数
layout: 'total,sizes,prev, pager, next, jumper', // 分页布局
},
// 博客分类
blogCategorys:[],
// 当前选中的博客分类
selectCategory:"",
// 当前选中的博客文章
multipleSelection:[]
}
},
mounted () {
this.getBlogList();
this.getBlogCategory();
},
// 路由更新时刷新数据
beforeRouteUpdate (to) {
this.getBlogList();
this.getBlogCategory();
},
methods : {
// 获取博客文章列表数据
getBlogList() {
getBlogList(this.queryParam).then(res => {
this.postList = res.data.items
this.pagination.total = res.data.total
this.pagination.currentPage= res.data.page
console.log(res.data)
}).catch(err => {
console.log(err)
})
},
// 获取博客分类数据
getBlogCategory() {
getBlogCategory().then(res => {
this.blogCategorys = res.data
console.log(res)
}).catch(err => {
console.log(err)
})
},
// 改变分页大小
handleSizeChange(val) {
this.pagination.pageSize = val;
this.queryParam.size = val;
this.getBlogList();
},
// 跳到当前页
handleCurrentChange(val) {
this.pagination.currentPage = val;
this.queryParam.page = val;
this.getBlogList();
},
// 切换Tab 刷新数据
handleClick(tab) {
this.queryParam.cateid = tab.props.name
this.getBlogList();
},
// 清空筛选项
clear() {
this.queryParam.words=""
this.getBlogList();
},

}
}
</script>

五、效果

elementplus表格
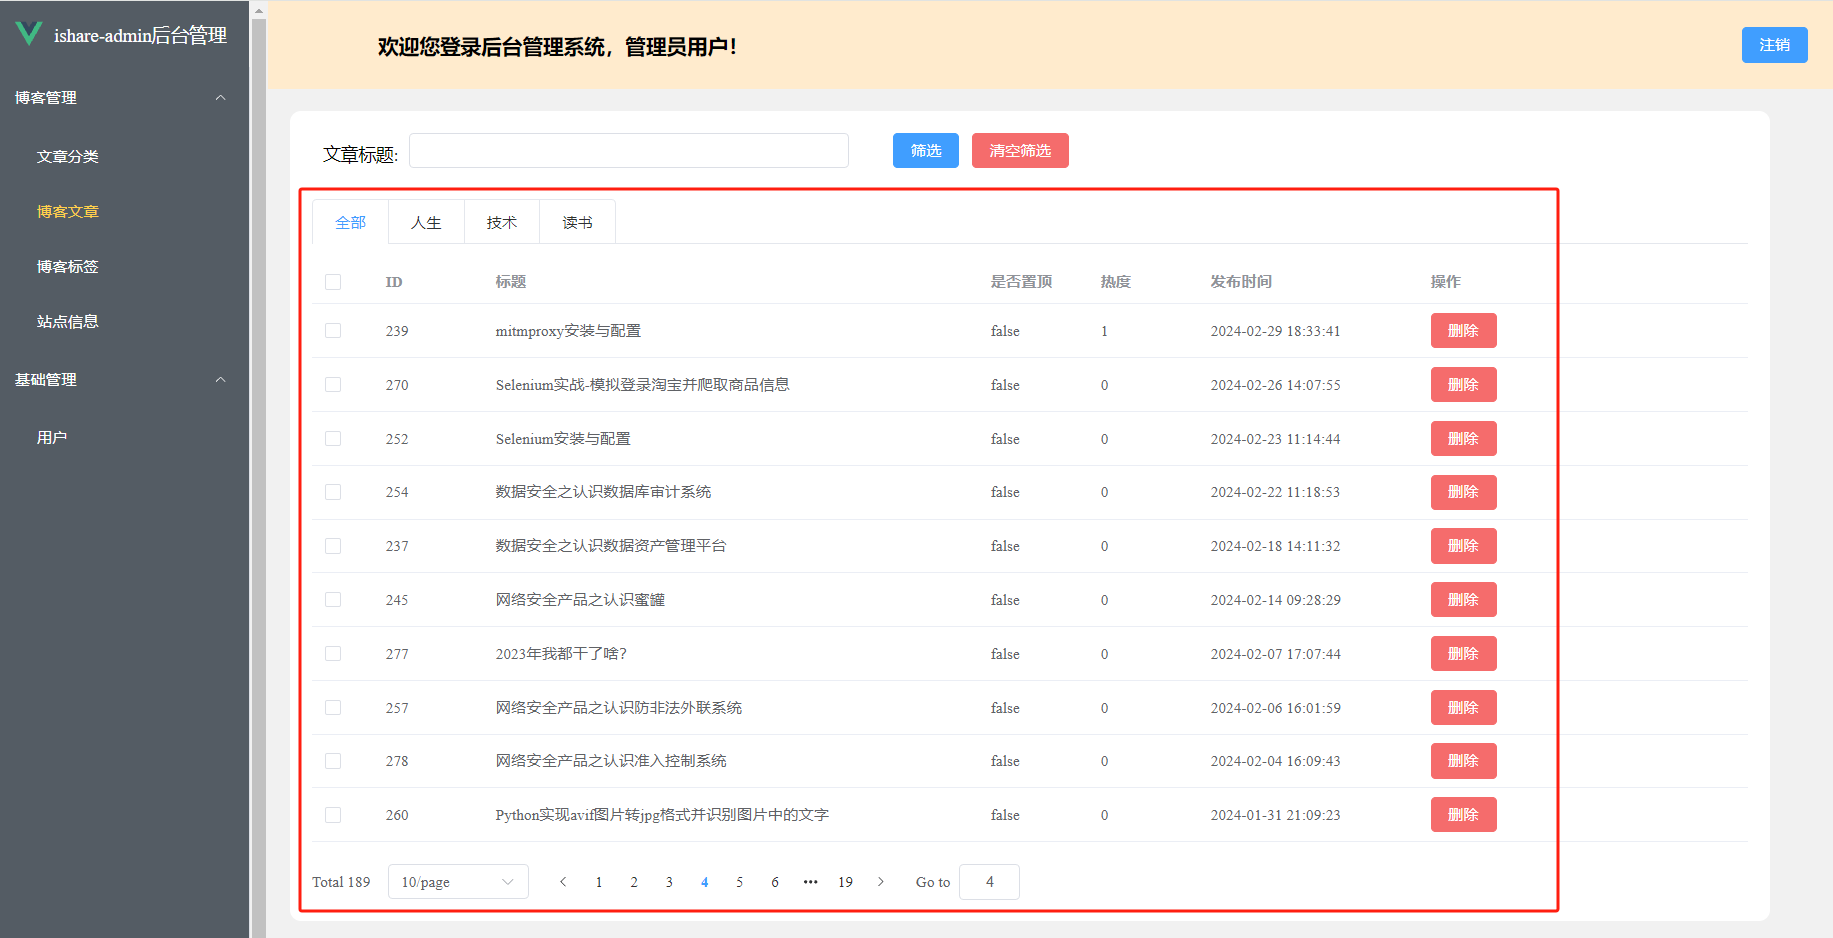
表格展示及数据分页是前端开发常用的功能,通过vue3+elementplus能够快速是实现对数据的展示及分页。


博客地址:http://xiejava.ishareread.com/


“fullbug”微信公众号

关注微信公众号,一起学习、成长!

0%